

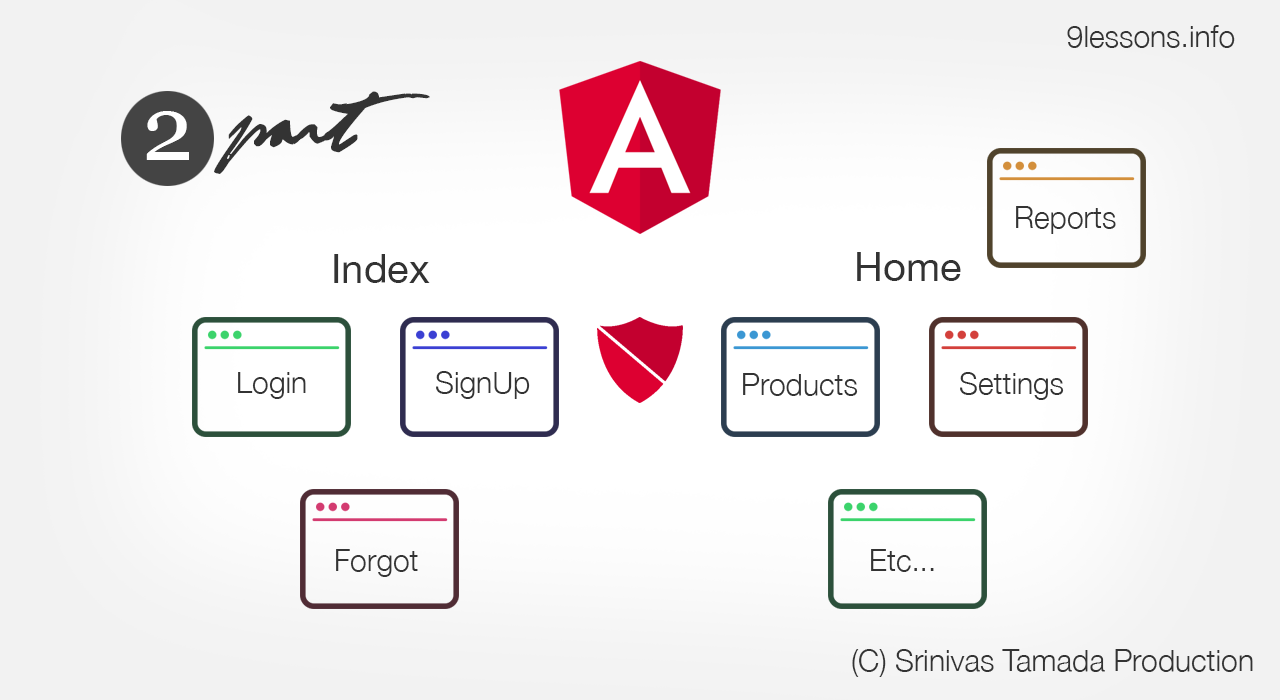
This is a continuation of my previous article Angular Lazy Load Routing using Route Guards. We covered the part to create different routes with menu design and generating child components. This post is about connecting the child routes with actual Angular authenticated guards and understanding the router linking with preventing route access. Take a quick look at the video for more information, hopefully I will continue this series go forward.
Live Demo
Video Tutorial - Angular Lazy Load Routing using Route Guards
RouterLink
This is an Angular RouterModule feature. You can this by call with router paths.
index.component.html
Modify the anchor tags with routerLink. You will find the path names in index.router.ts file.
<nav class="navbar" role="navigation" aria-label="main navigation">
</div>
<div class="navbar-brand">
<app-logo></app-logo>
<a role="button" class="navbar-burger" aria-label="menu" aria-expanded="false">
<span aria-hidden="true"></span>
<span aria-hidden="true"></span>
<span aria-hidden="true"></span>
</a>
</div>
<div class="navbar-menu">
<!-- <div class="navbar-start">AA</div> -->
<div class="navbar-end">
<a class="navbar-item " routerLink="/signup" routerLinkActive="active">
Signup
</a>
<a class="navbar-item " routerLink="/" routerLinkActive="active">
Login
</a>
</div>
</div>
</nav>
<div class="content">
<section class="section">
<div class="container mainBlock">
<router-outlet></router-outlet>
</div>
</section>
home.component.html
Same way from the home.router.ts. Here blank route represents Dashboard component and the logout link covered in future steps.
<nav class="navbar" role="navigation" aria-label="main navigation">
</div>
<div class="navbar-brand">
<a class="navbar-item">
<img src="https://bulma.io/images/bulma-logo.png" width="112" height="28">
</a>
</div>
<div class="navbar-menu">
<div class="navbar-end">
<a class="navbar-item " routerLink="/" >
Dashboard
</a>
<a class="navbar-item " routerLink="/products" >
Products
</a>
<a class="navbar-item " routerLink="/settings" >
Settings
</a>
<a class="navbar-item ">
Logout
</a>
</div>
</div>
</nav>
<div class="content">
<section class="section">
<div class="container mainBlock">
<router-outlet></router-outlet>
</div>
</section>
Run the application and test all the of the routes are working or not.
Create a Service
Auth Service
Authentication service for connecting with APIs. Use the following command to generate the default code.
$ ng generate service services/Auth
auth.service.ts
Include all your actions related to user authentications.
import { Injectable } from '@angular/core';
}
@Injectable({
providedIn: 'root'
})
export class AuthService {
constructor() {}
public isAuthenticated(): boolean {
// Return true or false
return true;
}
public login(postData) {
// login actions
}
public signup(postData) {
// login actions
}
public logout() {
// logout actions
}

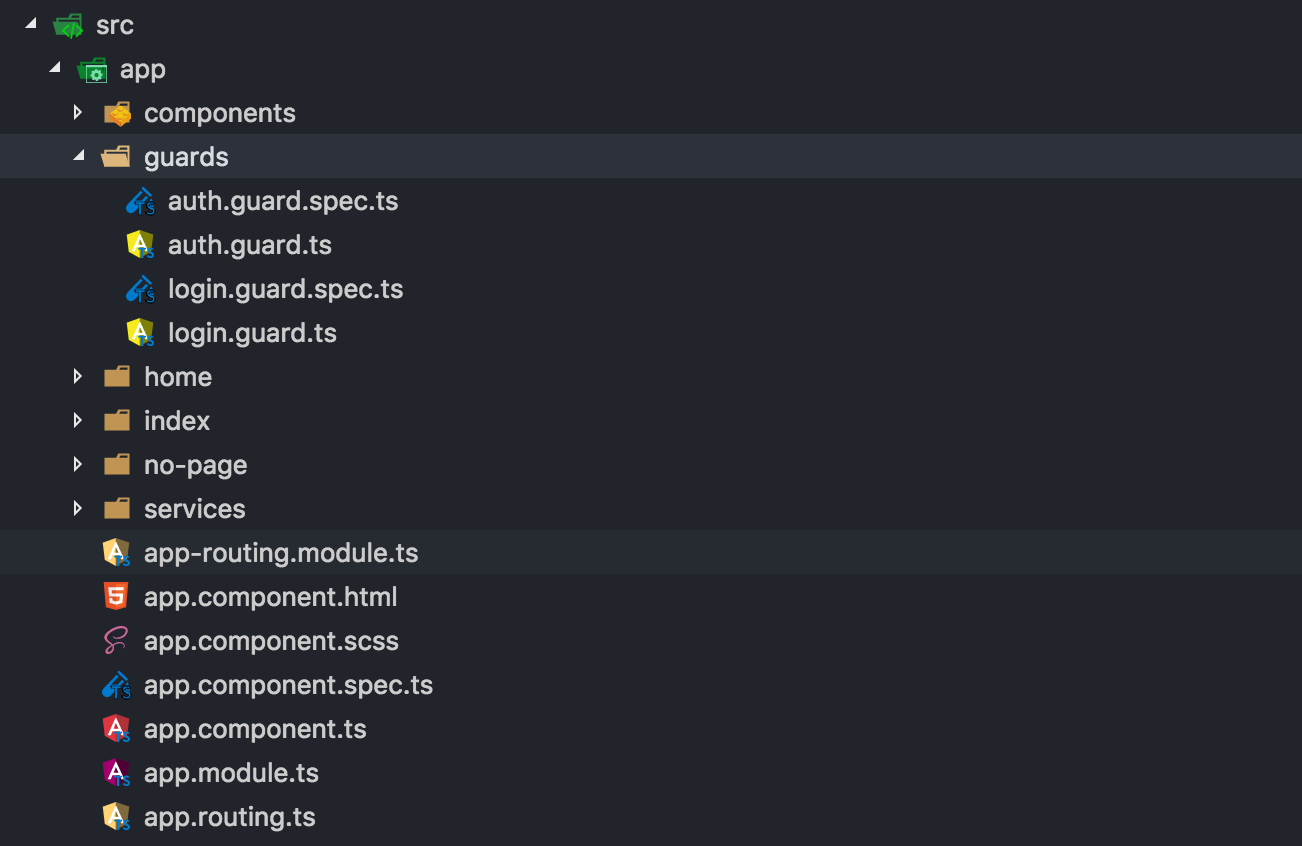
Guards
Guards for accessing authenticated users.
Auth Guard
Create a service folder
$ ng generate guard guards/Auth
auth.guard.ts
Checking the user is authenticated, if not redirecting to login page.
import { AuthService } from './auth.service';
}
import { Injectable } from '@angular/core';
import { Router, CanActivate } from '@angular/router';
@Injectable()
export class AuthGuardService implements CanActivate {
constructor(public authService: AuthService, public router: Router) {}
canActivate(): boolean {
if (!this.authService.isAuthenticated()) {
this.router.navigate(['login']);
return false;
}
return true;
}
Login Guard
Create a service folder
$ ng g g guards/Login
login.guard.ts
Unauthenticated guard, once the user authenticated we should allow to login, signup pages.
import { AuthService } from './auth.service';
}
import { Injectable } from '@angular/core';
import { Router } from '@angular/router';
@Injectable({
providedIn: 'root'
})
export class LoginGuardService {
constructor(public authService: AuthService, public router: Router) { }
canActivate(): boolean {
if (this.authService.isAuthenticated()) {
this.router.navigate(['']);
return false;
}
return true;
}
Create the files under guards folder.
Import Services and Guard
Import auth and auth.guard into application module. Login guard doesn't have default path, so no need to import that here.
import { AuthGuard } from './guards/auth.guard';
import { AuthService } from './services/auth.service';
import { BrowserModule } from '@angular/platform-browser';
import { NgModule } from '@angular/core';
import { RouterModule } from '@angular/router';
import { routes } from './app.routing';
import { AppRoutingModule } from './app-routing.module';
import { AppComponent } from './app.component';
import { IndexComponent } from './index/index.component';
import { HomeComponent } from './home/home.component';
import { HomeModule } from './home/home.module';
import { IndexModule } from './index/index.module';
import { LogoComponent } from './components/logo/logo.component';
import { NoPageComponent } from './no-page/no-page.component';
@NgModule({
declarations: [
AppComponent,
IndexComponent,
HomeComponent,
LogoComponent,
NoPageComponent
],
imports: [
BrowserModule,
AppRoutingModule,
HomeModule,
IndexModule,
RouterModule.forRoot(routes)
],
providers: [AuthService, AuthGuard],
bootstrap: [AppComponent]
})
export class AppModule { }
index.module.ts
Under this route we are going to implement some forms for login and signup. So that you have to import FormsModule and RouterModule
import { NgModule } from "@angular/core";
export class IndexModule {}
import { FormsModule } from '@angular/forms';
import { RouterModule } from '@angular/router';
import { CommonModule } from "@angular/common";
import { LoginComponent } from "./login/login.component";
import { SignupComponent } from "./signup/signup.component";
import { ForgotComponent } from "./forgot/forgot.component";
import { SystemErrorComponent } from "./system-error/system-error.component";
@NgModule({
imports: [CommonModule, FormsModule, RouterModule],
declarations: [
LoginComponent,
SignupComponent,
ForgotComponent,
SystemErrorComponent
]
})
home.module.ts
Follow the same if you are using forms, else just import the RouterModule for connecting pages.
import { NgModule } from '@angular/core';
import { CommonModule } from '@angular/common';
import { SettingsComponent } from './settings/settings.component';
import { DashboardComponent } from './dashboard/dashboard.component';
import { ProductsComponent } from './products/products.component';
import { RouterModule } from '@angular/router';
@NgModule({
imports: [
CommonModule, RouterModule
],
declarations: [SettingsComponent, DashboardComponent, ProductsComponent]
})
export class HomeModule { }
Working with Guards
index.routes.ts
Import the LoginGuard and connect the route using CanActive
import { ForgotComponent } from './forgot/forgot.component';
];
import { SignupComponent } from './signup/signup.component';
import { Route } from '@angular/router';
import { LoginComponent } from './login/login.component';
import { SystemErrorComponent } from './system-error/system-error.component';
import { IndexComponent } from './index.component';
import { LoginGuard } from '../guards/login.guard';
export const IndexRoutes: Route[] = [
{
path: '',
component: IndexComponent,
canActivate: [LoginGuard],
children: [
{
path: 'login',
component: LoginComponent
},
{
path: 'signup',
component: SignupComponent
},
{
path: 'forgot',
component: ForgotComponent
},
{
path: 'system-error',
component: SystemErrorComponent
}
]
}
home.routes.ts
Import AuthGuard and connect with CanActivate method.
import { AuthGuard } from './../guards/auth.guard';
import { ProductsComponent } from './products/products.component';
import { DashboardComponent } from './dashboard/dashboard.component';
import { Route } from '@angular/router';
import { HomeComponent } from './home.component';
import { SettingsComponent } from './settings/settings.component';
export const HomeRoutes: Route[] = [
{
path: '',
component: HomeComponent,
canActivate: [AuthGuard],
children: [
{ path: '', component: DashboardComponent },
{ path: 'settings', component: SettingsComponent },
{ path: 'products', component: ProductsComponent}
]
}
];
Service
For more help follow this article Ionic 3 and Angular 4: PHP Restful API User Authentication for Login and Signup.
Login Asynchronous Function
Just assume the login API is giving back the following response, just store the response with sessionStorage. Here async and await helps to convert this as promise. Sometimes sessionsStorage little delay.
public async login(postData) {
}
const loginApiResponce = {
name: 'Srinivas Tamada',
uid: 1,
token: '2323523523DFSWERWERWER'
};
await sessionStorage.setItem('userData', JSON.stringify(loginApiResponce));
return true;
Logout Asynchronous Function
Clearing all the sessionsStorage values with keys.
public async logout() {
}
await sessionStorage.removeItem('userData');
await sessionStorage.clear();
return true;
isAuthenticated Function
Returns user is authenticated or not.
public isAuthenticated(): boolean {
}
const userData = sessionStorage.getItem('userData');
if (userData && userData.length > 0) {
return true;
} else {
return false;
}
home.component.ts
Implement logoutAction a control function using the authService.
import { Router } from '@angular/router';
}
import { AuthService } from './../services/auth.service';
import { Component, OnInit } from '@angular/core';
@Component({
selector: 'app-home',
templateUrl: './home.component.html',
styleUrls: ['./home.component.scss']
})
export class HomeComponent implements OnInit {
constructor(public authService: AuthService, public router: Router) { }
ngOnInit() {
}
logoutAction(){
if(this.authService.logout())
{
this.router.navigate(['login']);
}
}
home.component.html
Connect the anchor tag with loignAction() function.
<a class="navbar-item " (click)="logoutAction()">
</a>
<span class="icon has-text-danger">
<i class="fas fa-ban"></i>
</span> Logout
login.component.ts
Implement the loginAction for connecting with the API.
import { Router } from '@angular/router';
import { AuthService } from './../../services/auth.service';
import { Component, OnInit } from '@angular/core';
@Component({
selector: 'app-login',
templateUrl: './login.component.html',
styleUrls: ['./login.component.scss']
})
export class LoginComponent implements OnInit {
postData = {
'email': '',
'password': ''
}
public errorText: string;
constructor(public authService: AuthService, public router: Router) {
this.errorText = '';
}
ngOnInit() {
}
loginAction(){
if(this.postData.email && this.postData.password){
if(this.authService.login(this.postData)){
this.router.navigate(['']);
}
} else {
this.errorText = 'Please give valid data'
}
}
}
login.component.html
Bind the postData with the Form inputs.
<div class="column is-half">
</div>
<h1>Login</h1>
<div class="field">
<div class="control">
<input class="input " type="text" placeholder="Email" [(ngModel)]="postData.email" >
</div>
</div>
<div class="field">
<div class="control">
<input class="input" type="password" placeholder="Password" [(ngModel)]="postData.password">
</div>
</div>
<div class="field">
<div class="control">
<span class='has-text-danger'>{{errorText}}</span>
</div>
</div>
<div class="field">
<div class="control">
<a routerLink="/forgot" >Forgot password?</a>
</div>
</div>
<a class="button is-primary" (click)="loginAction()">Login</a>
Video Tutorial - Angular Lazy Load Routing using Route Guards


HELPFUL, looking for server side rendering article
ReplyDeleteyou are the one conducting a very good job..nice post
ReplyDeleteNice Artical Sir.
ReplyDeleteHi Sir,
ReplyDeleteIf We import FormsModule and RouterModule in AppModule.ts, this module's scope available to all child components ?
Or we need to import again in child module's ?
Can you please explain these.
Nice post sir
ReplyDeleteHi, Srinivas
ReplyDeletenice article , keep informed us in future.
Nice sir your post is always outstanding
ReplyDeleteGreat source of information. the information is showing only what is required.
ReplyDeletethanks for Sharing.
thank u sir
ReplyDelete