

This article is the continuation of previous post Create an Angular 2 CLI App with Firebase Social Authentication. This post further explains the authentication feature for your Angular CLI application using Firebase. AngularFire is the library used for this. In addition to this, we require some Angular providers called sign-in providers to use Firebase Authentication feature. This article explains Facebook, Google and Twitter authentication to log in with our users. Follow the demo and article to install and setup AngularFire library and build your angular web application with an easy and perfect login authentication. Also, the article explains how to redirect to home page from other pages and vice-versa.

 Live Demo
 Working with Angular Firebase
Go to your project folder and import Angular Firabase module using NPM.
$ npm install firebase angularfire2 --save
app.module.ts
Whenever you install some module, you must include this in app.module.ts. Do following changes for importing Angular Firebase methods.
import { BrowserModule } from '@angular/platform-browser';
import { NgModule } from '@angular/core';
import { FormsModule } from '@angular/forms';
import { HttpModule } from '@angular/http';
import { RouterModule, Routes } from '@angular/router';
import { MaterialModule } from '@angular/material';
import { AngularFireModule } from 'angularfire2';
import { AppComponent } from './app.component';
import { LoginPageComponent } from './login-page/login-page.component';
import { HomePageComponent } from './home-page/home-page.component';
const routes: Routes = [
{ path: 'home', component: HomePageComponent },
{ path: '', component: LoginPageComponent }
];
export const firebaseConfig = {
apiKey: 'api key',
authDomain: "domain address",
databaseURL: "database URL",
storageBucket: "storage bucket us",
messagingSenderId: "Message Sender ID"
};
@NgModule({
declarations: [
AppComponent,
LoginPageComponent,
HomePageComponent
],
imports: [
BrowserModule,
FormsModule,
HttpModule,
RouterModule.forRoot(routes),
MaterialModule.forRoot(),
AngularFireModule.initializeApp(firebaseConfig)
],
providers: [],
bootstrap: [AppComponent]
})
export class AppModule { }
Firebase Console
Go to your Google Firebase console, click on Add Firebase to your web app

Firebase Configuration Keys
You will find keys in following way, use this information in app.module.ts firebaseConfig object.

Providers
This is an injector service for Angular. Create a providers folder with contains af.ts typescript file.

af.ts
This component we are going to import in login-page and home-page components. Here we are calling Angular Firebase method for login and logout with different social authentication providers.
import { Injectable } from "@angular/core";
import { AngularFire, AuthProviders, AuthMethods } from 'angularfire2';
@Injectable()
export class AF {
constructor(public af: AngularFire) { }
socialLogin(loginProvider) {
var provider;
if (loginProvider === 'google') {
provider = AuthProviders.Google;
}
else if (loginProvider === 'facebook') {
provider = AuthProviders.Facebook;
}
else if (loginProvider === 'github') {
provider = AuthProviders.Github;
}
else if (loginProvider === 'twitter') {
provider = AuthProviders.Twitter;
}
return this.af.auth.login({
provider: provider,
method: AuthMethods.Popup,
});
}
// Logs out the current user
logout() {
return this.af.auth.logout();
}
}
app.module.ts
Introduce this provider to app.module.ts. Take a look at the highlighted parts.
import { BrowserModule } from '@angular/platform-browser';
import { NgModule } from '@angular/core';
import { FormsModule } from '@angular/forms';
import { HttpModule } from '@angular/http';
import { RouterModule, Routes } from '@angular/router';
import { MaterialModule } from '@angular/material';
import { AngularFireModule } from 'angularfire2';
import { AF } from './providers/af';
import { AppComponent } from './app.component';
import { LoginPageComponent } from './login-page/login-page.component';
import { HomePageComponent } from './home-page/home-page.component';
const routes: Routes = [
{ path: 'home', component: HomePageComponent },
{ path: '', component: LoginPageComponent }
];
export const firebaseConfig = {
apiKey: 'api key',
authDomain: "domain address",
databaseURL: "database URL",
storageBucket: "storage bucket us",
messagingSenderId: "Message Sender ID"
};
@NgModule({
declarations: [
AppComponent,
LoginPageComponent,
HomePageComponent
],
imports: [
BrowserModule,
FormsModule,
HttpModule,
RouterModule.forRoot(routes),
MaterialModule.forRoot(),
AngularFireModule.initializeApp(firebaseConfig)
],
providers: [AF],
bootstrap: [AppComponent]
})
export class AppModule { }
Login and Logout
app.component.ts
Main app component is handling the user login status and user data. If the use login is success, user data is storing in local database.
import { Component } from '@angular/core';
import { AF } from "./providers/af";
import { Router } from "@angular/router";
@Component({
selector: 'app-root',
templateUrl: './app.component.html',
styleUrls: ['./app.component.css']
})
export class AppComponent {
public isLoggedIn: boolean;
constructor(public afService: AF, private router: Router) {
this.afService.af.auth.subscribe(
(auth) => {
if (auth == null) {
console.log("Not Logged in.");
this.isLoggedIn = false; //login fail
this.router.navigate(['']); // redirecting to login page
}
else {
console.log("Successfully Logged in.");
this. isLoggedIn = true; //login success
//storing userData value in bower location storage.
localStorage.setItem('userData', JSON.stringify(auth.auth));
this.router.navigate(['home']); // redirecting to home page
}
}
);
}
logout() {
localStorage.setItem('userData', '');
this.afService.logout();
}
}
app.component.html
Here logout button works based on isLoggedIn flag value.
<md-toolbar color="primary">
<span> 9lessons Firebase Social Login Project</span>
<span class="spacer"></span>
<div *ngIf="isLoggedIn">
<a (click)="logout()">Logout</a>
</div>
</md-toolbar>
<div class="app-content">
<md-card>
<div class="app-content">
<router-outlet></router-outlet>
</div>
</md-card>
</div>
<footer>
<md-toolbar class="md-scroll-shrink">
<div layout="row" layout-align="center center" flex>
Srinivas Tamada Production
</div>
</md-toolbar>
</footer>
Login Page
login-page.component.ts
Here importing the injectable af.ts provider calling inside the socialLogin function. If the user data is available redirecting to home page by using router navigate.
import { Component, OnInit } from '@angular/core';
import { AF } from ".././providers/af";
import { Router } from "@angular/router";
@Component({
selector: 'app-login-page',
templateUrl: './login-page.component.html',
styleUrls: ['./login-page.component.css']
})
export class LoginPageComponent implements OnInit {
constructor(public afService: AF, private router: Router) { }
ngOnInit() {}
socialLogin(loginProvider) {
this.afService.socialLogin(loginProvider).then((data) => {
// Send them to the homepage if they are logged in
this.router.navigate(['home']);
})
}
}
login-page.component.html
Calling scope functions with (click) action.
<div class="loginmodal-container">
<h1>Login to Your Social Account</h1>
<button class='google' (click)="socialLogin('google')" md-raised-button>
<i class="fa fa-google" ></i> Login With Google
</button>
<button class="github" (click)="socialLogin('github')" md-raised-button>
<i class="fa fa-github" ></i> Login With Github
</button>
<button color="primary" (click)="socialLogin('twitter')" md-raised-button>
<i class="fa fa-twitter" ></i> Login With Twitter
</button>
<button class="facebook" (click)="socialLogin('facebook')" md-raised-button>
<i class="fa fa-facebook" ></i> Login With Facebook
</button>
</div>
Home Page
home-page.component.ts
Here user function parsing the local storage JSON data and assign to userData scope object.
import { Component, OnInit } from '@angular/core';
@Component({
selector: 'app-home-page',
templateUrl: './home-page.component.html',
styleUrls: ['./home-page.component.css']
})
export class HomePageComponent implements OnInit {
userData: any;
constructor() {
this.user();
}
ngOnInit() {}
user() {
if (localStorage.getItem('userData')) {
this.userData = JSON.parse(localStorage.getItem('userData'));
}
else {
console.log("No Data");
}
}
}
home-page.component.html
Binding user data with HTML tags.
<div class="homemodal-container">
<div class="row">
<div>
<h1>
Welcome {{userData.displayName}}
</h1>
<h2>{{userData.email}}</h2>
<img src="{{userData.photoURL}}" class="profilePic"/>
</div>
</div>
</div>
<div class="row">
<div>
<h1>
Welcome {{userData.displayName}}
</h1>
<h2>{{userData.email}}</h2>
<img src="{{userData.photoURL}}" class="profilePic"/>
</div>
</div>
</div>
styles.scss
Include this extra styling for colorful buttons.
$white: #ffffff;
.loginmodal-container {
.google {
background-color: #dd4b39 !important;
}
.github {
background-color: #333333 !important;
}
.facebook {
background-color: #006699 !important;
}
.fa {
font-size: 20px;
color: $white;
margin-right: 5px;
}
button {
margin-right: 10px;
margin-bottom: 10px;
}
}
.homemodal-container{
img{
width: 150px;
}
}
Firebase Social Application Settings
Go to Firebase Dashboard then navigate Authentication page, select SIGN-IN Method tab. Enable login options, here you have to provide your social application keys.

Note: No need to create any application for Google
Facebook Application Setup

Go to Facebook Developer Tools and create a new application.
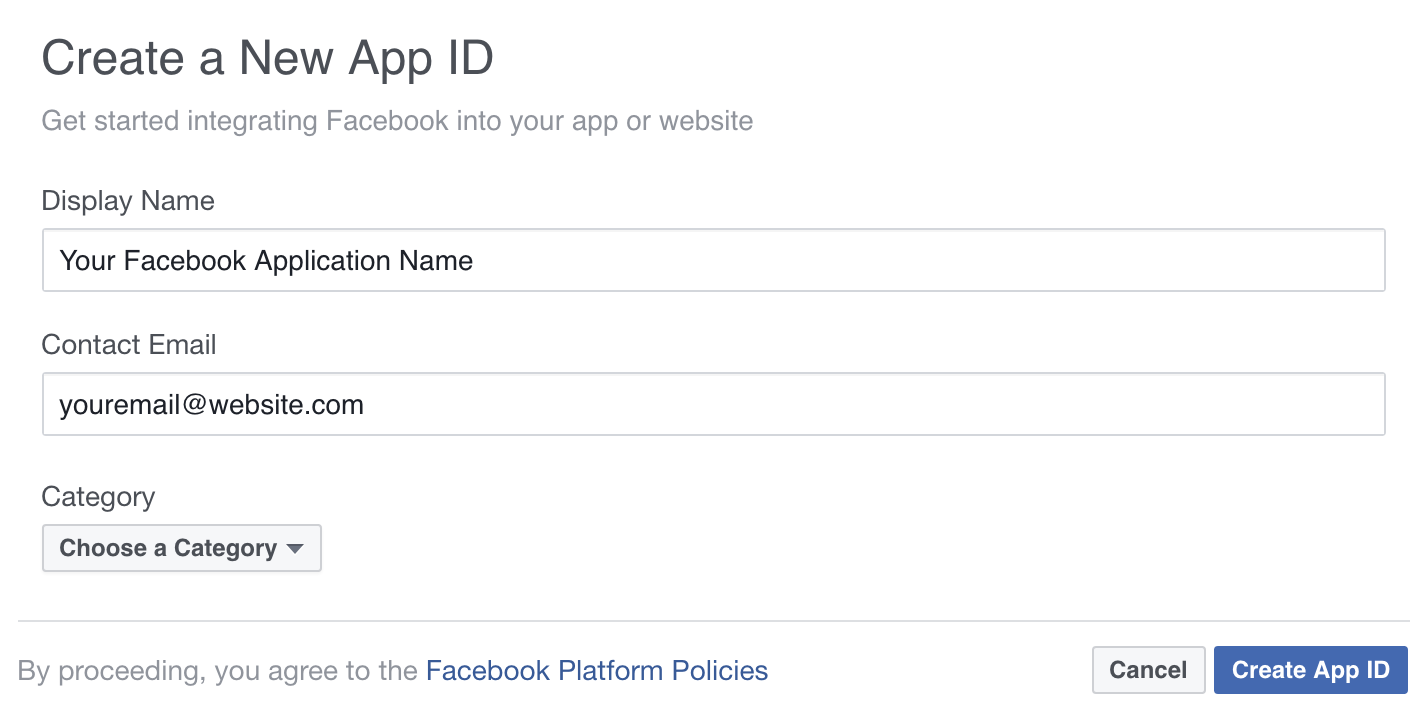
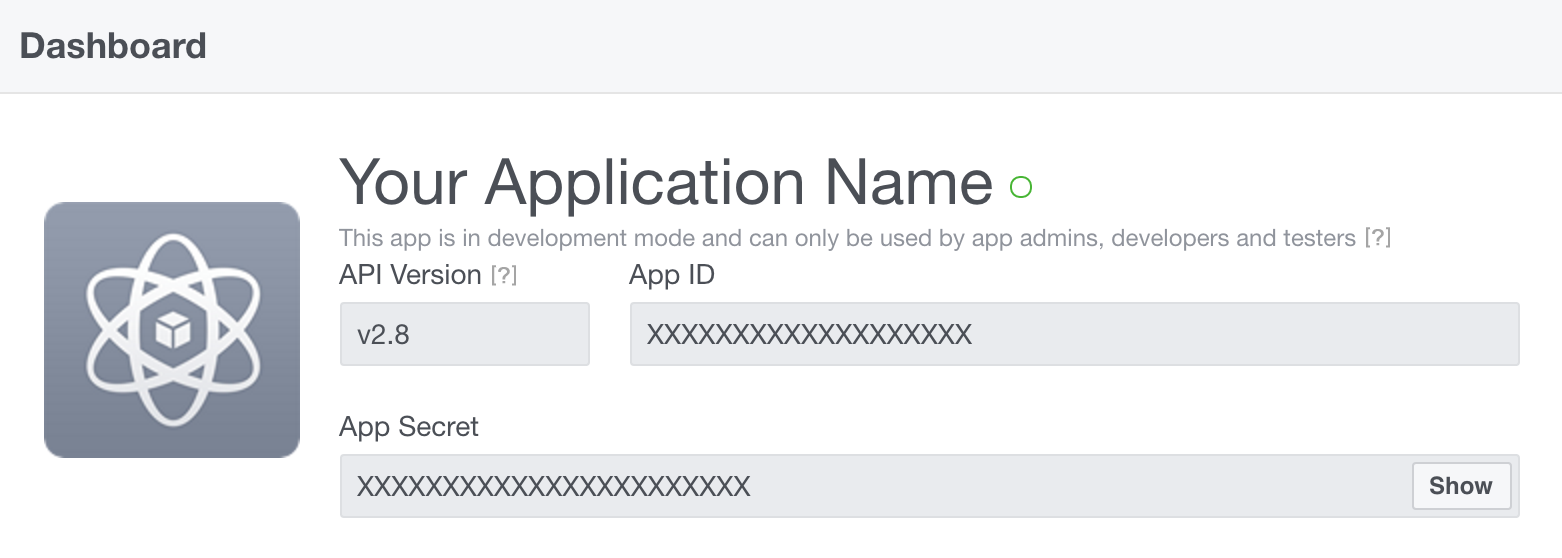
App Keys
Callback URL
This must be your Google Firebase URL, you will find while enabling Facebook Login Options

GitHub Application Setup
Go create a Github application, give rediction URL as your domain.

Go to Twitter Apps and create new application.
For more information read OauthLogin Documentation
Firebase Custom Domain Setup
Go to Firebase setting and connect your cloud url with custom domain.


Thanks, it's really need a work around...
ReplyDeleteHelpful Post, Thanks for share it.
ReplyDeleteThank you for sharing! It appears AngularFire2 was updated in version 4 that changed the authentication quite a bit. Do you think you could update this to reflect the changes?
ReplyDeleteThis part of the tutorial is broken. After the first "npm install firebase angularfire2 --save" instruction, I get:
ReplyDeleteWARNING in ./src/app/providers/af.ts
19:23-36 "export 'AuthProviders' was not found in 'angularfire2'
WARNING in ./src/app/providers/af.ts
22:23-36 "export 'AuthProviders' was not found in 'angularfire2'
WARNING in ./src/app/providers/af.ts
25:23-36 "export 'AuthProviders' was not found in 'angularfire2'
WARNING in ./src/app/providers/af.ts
28:23-36 "export 'AuthProviders' was not found in 'angularfire2'
WARNING in ./src/app/providers/af.ts
32:20-31 "export 'AuthMethods' was not found in 'angularfire2'
WARNING in ./src/app/providers/af.ts
41:62-73 "export 'AngularFire' was not found in 'angularfire2'
WARNING in ./src/app/providers/af.ts
41:93-104 "export 'AngularFire' was not found in 'angularfire2'