How do you increase the site’s traffic? E-commerce businesses’ main goal is to keep engage their existed subscribers and get the new visitors. There are many ways to grow site’s traffic and customer engagement - by sending email notifications, SMS alerts, through social media and do web push notifications. Today, we are going to see how push notifications work for web browsers. These are the notifications that are sent to the users through desktop and mobile browsers. These notifications are delivered on a user’s desktop or mobile browser — regardless of whether or not the user is on the website. These notifications allow users to get timely updates from sites they love and allow developers to effectively re-engage them with relevant content to increase site’s traffic. Let’s start how this works.
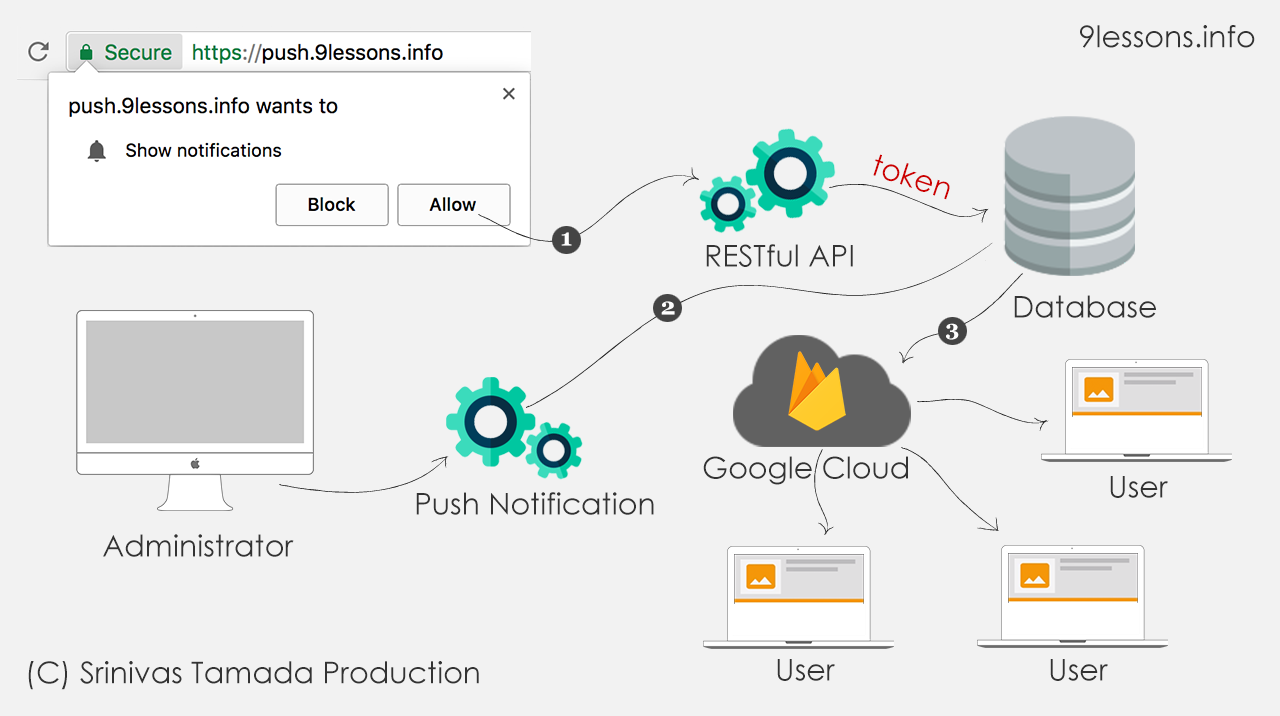
Live Demo
This project is required following items
Website
Frontend website you have to include manifest.json file in the index.html
manifest.json
Basic metadata information about your website extension, this will help you to communicate with browser actions.
service-worker.js
This is a script file that your browser runs in the background and perform sync operations.
notification.js
A JavaScript file to allow browser notification. This has all the actions to send user registration token information to the backend server.
RESTful or ServerSide URL
Subscribe
Create a simple service side insert operation to store the user registration token.
Unsubscribe
Same way create a delete operation to delete the user registration token from the database.
Get Notification
This URL should return a notification data in JSON data format.
CURL Push Notification Application
A Server-side CURL project to send notifications to the subscribed users list.
Database
You have to create a database for storing user registration ids/tokens.
CREATE TABLE GMC{
gid INT PRIMARY KEY AUTO_INCREMENT,
rid TEXT
}
gid INT PRIMARY KEY AUTO_INCREMENT,
rid TEXT
}
This will contain a push notification data.
CREATE TABLE notifications{
nid INT PRIMARY KEY AUTO_INCREMENT,
title VARCHAR(200),
msg VARCHAR(200),
logo VARCHAR(300),
name VARCHAR(100),
url VARCHAR(300)
}
nid INT PRIMARY KEY AUTO_INCREMENT,
title VARCHAR(200),
msg VARCHAR(200),
logo VARCHAR(300),
name VARCHAR(100),
url VARCHAR(300)
}
Getting started with Firebase
Step 1
Create a Firebase project for Google Cloud Messing.
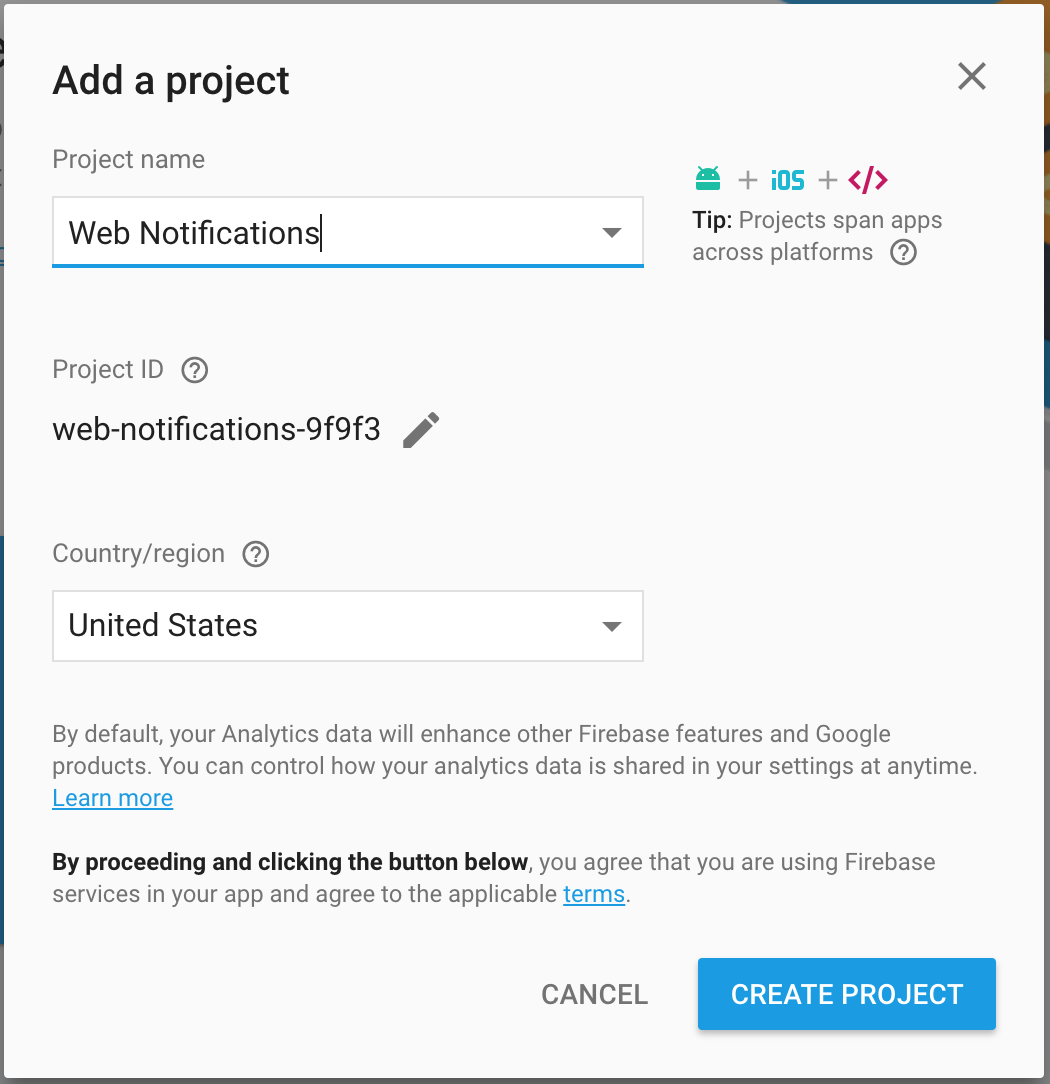
Step 2
Login to Google Developer Console and go to your Dashboard

Step 3
Agree firebase terms.
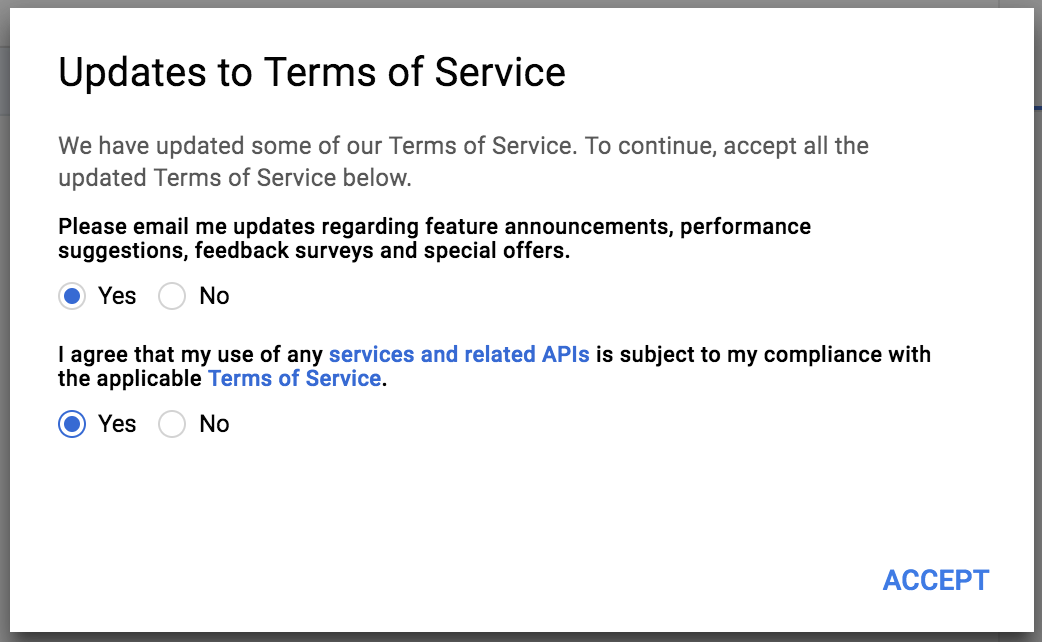
Step 3
Select your API project.

Step 4
Click select and choose your existing Firebase project.
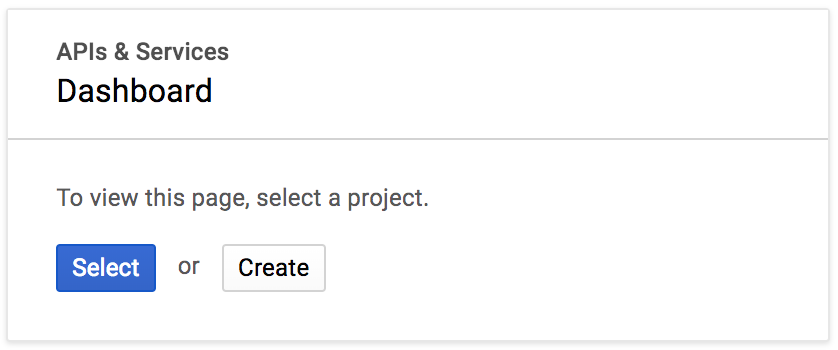
Step 5
Choose existing project
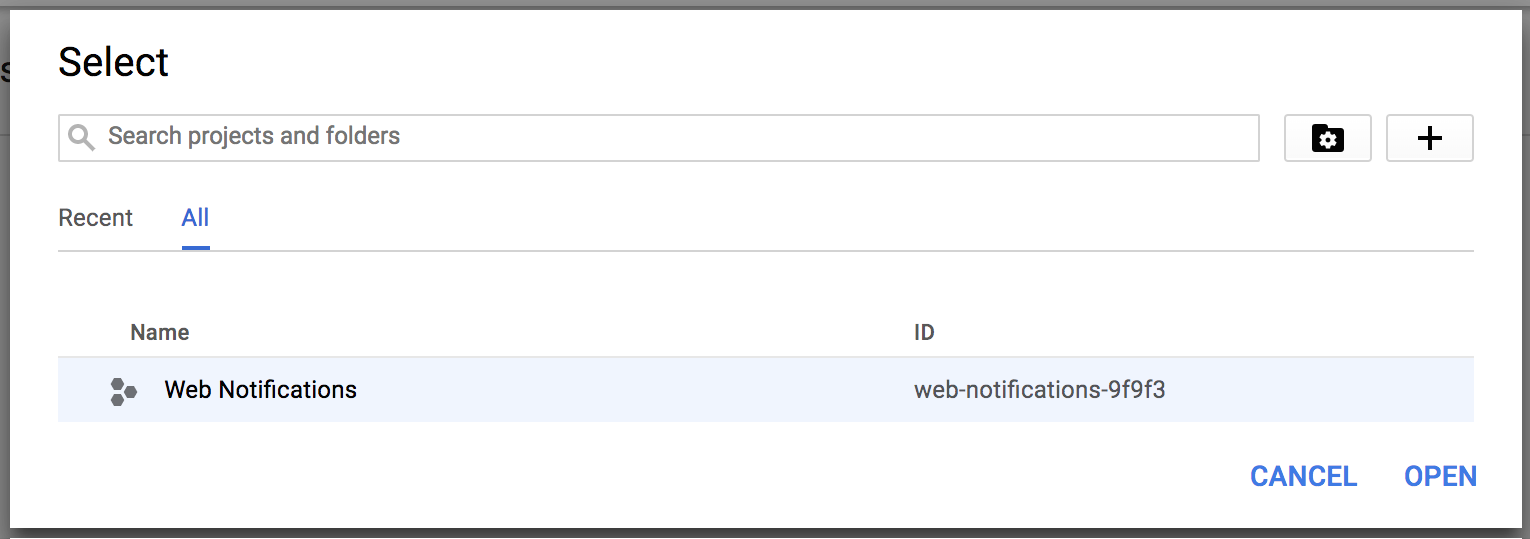
Step 6
Copy your project authentication key for sending Google Cloud Messaing
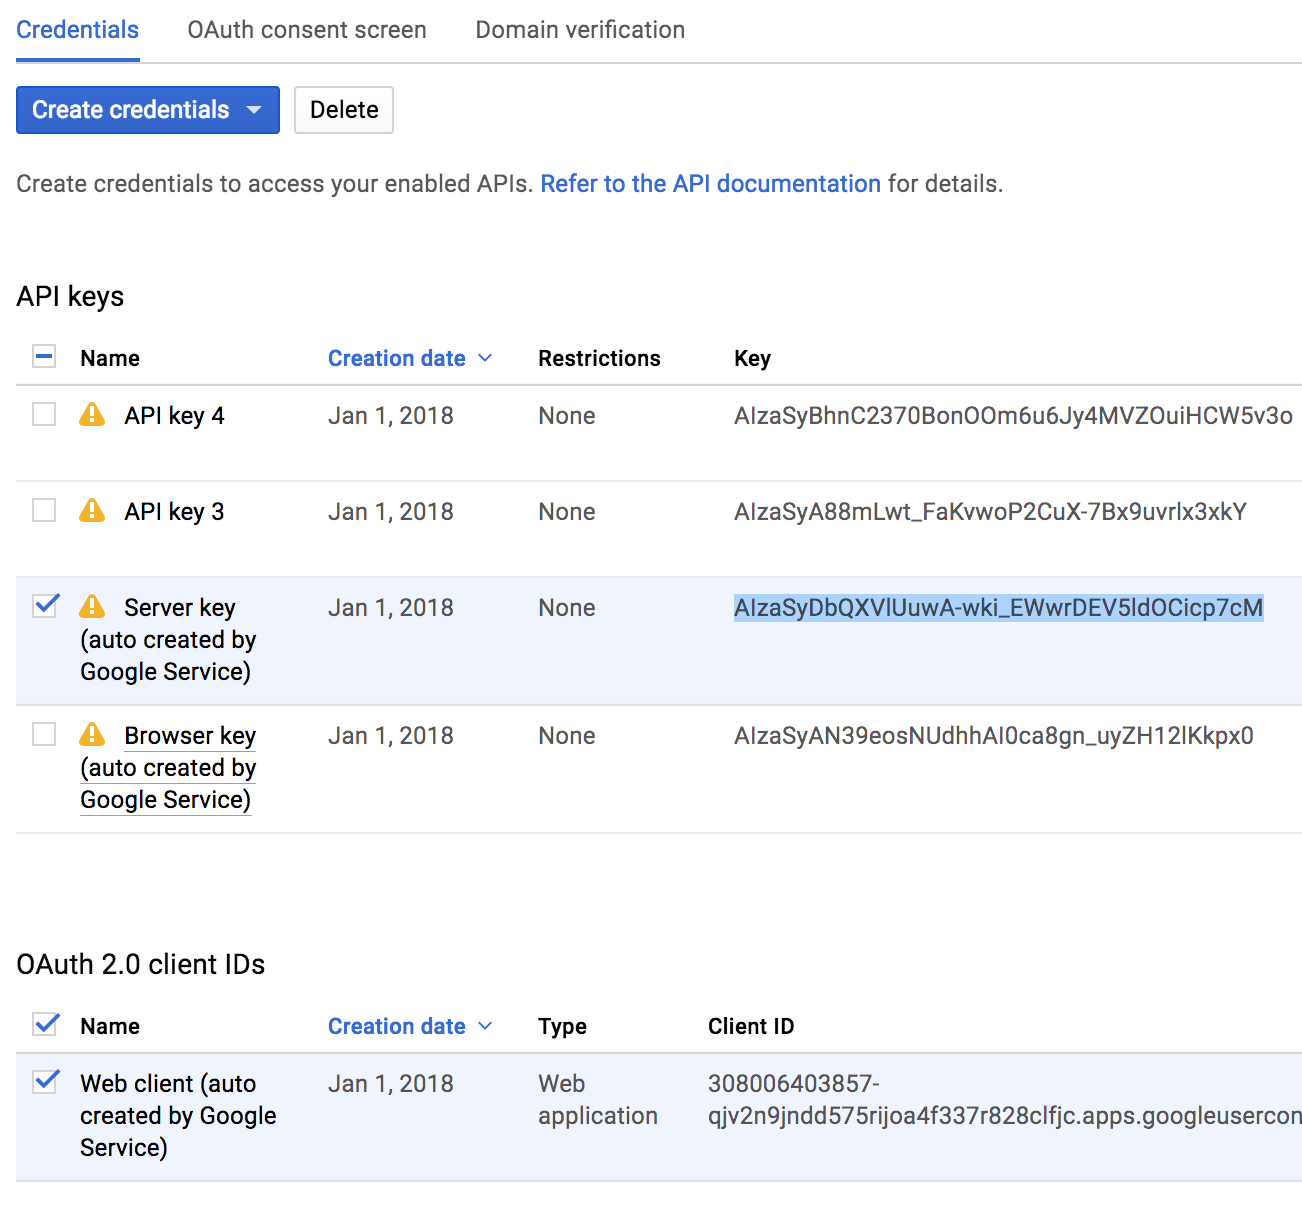
Step 7
Your project client id.
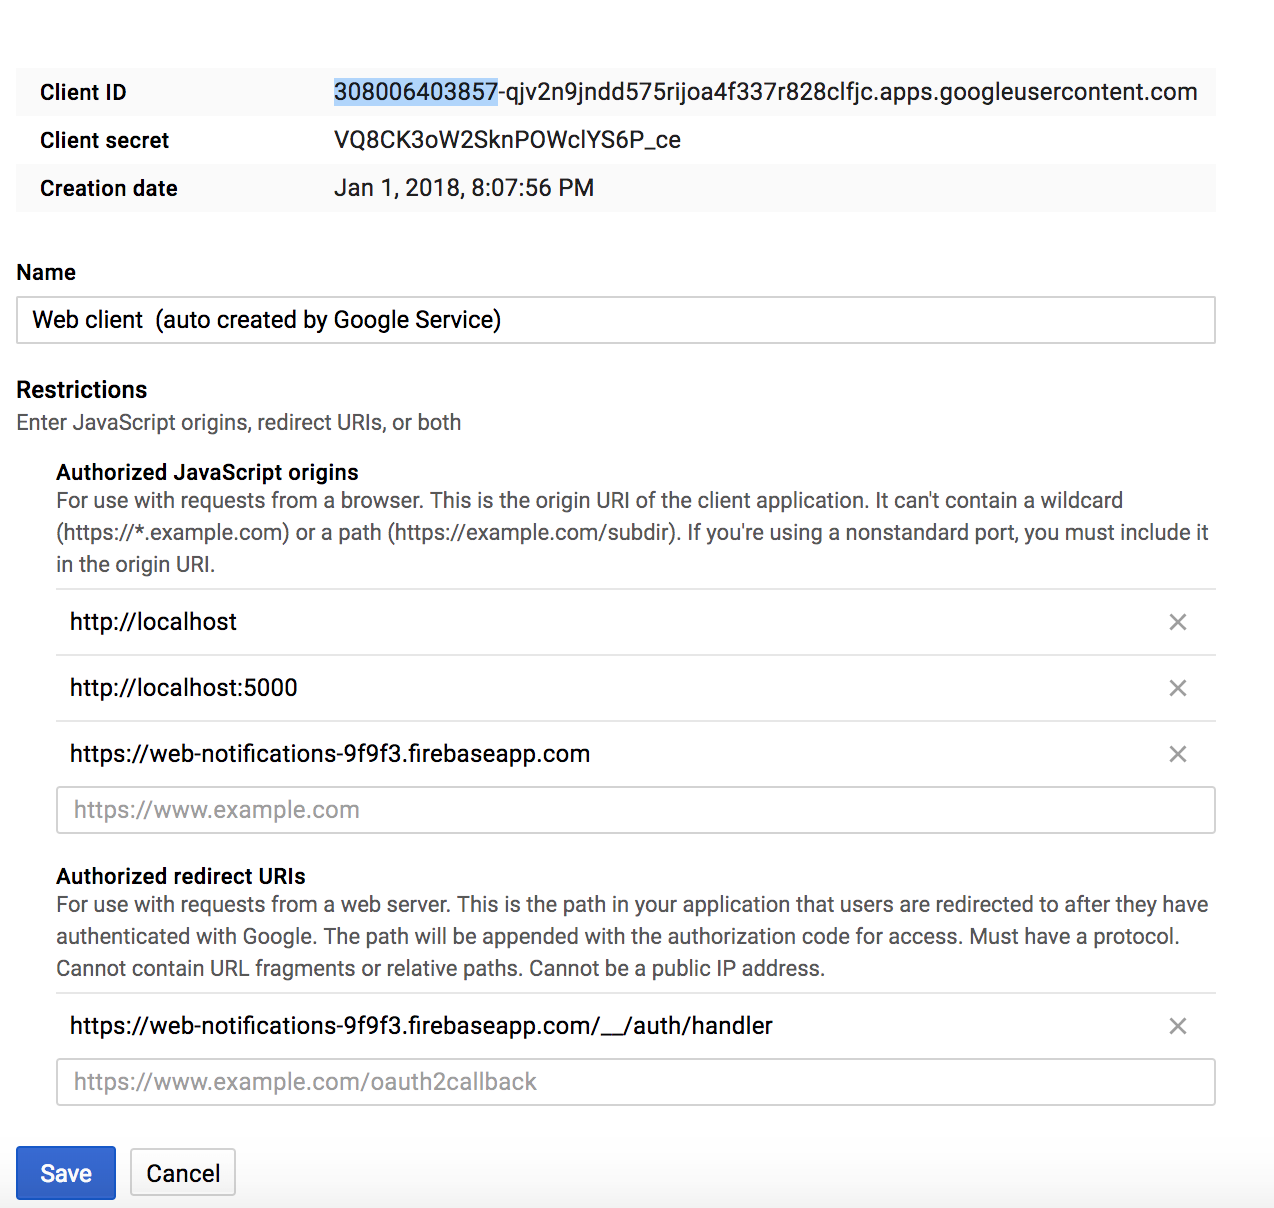
manifest.json
Meta data information file to communicate with browsers. Here include your project client id, check Step 7 screenshot.
{
}
"name": "Web Push Demo",
"short_name": "push_demo",
"version": "1.0.0",
"description": "A simple site with push notification",
"author": {
"name": "Srinivas Tamada"
},
"gcm_sender_id": "Your_Client_ID",
"gcm_user_visible_only": true
service-worker.js
JavaScript file that your browser runs at the background and perform sync operations. This will always communicate with your project api to get latest notification information. Upload this file in your project index location.
var self = this;
});
var urlMain;
self.addEventListener("push", function(event) {
event.waitUntil(
fetch("https://yourwebiste.com/api/getNotification", {
method: "get"
})
.then(function(response) {
return response.json();
})
.then(function(result) {
urlMain = result.data.url;
const options = {
body: result.data.msg,
icon: result.data.logo,
image: result.data.name,
action: result.data.url
};
self.registration.showNotification(result.data.title, options);
})
);
});
self.addEventListener("notificationclick", function(event) {
event.notification.close();
const promiseChain = clients.openWindow(urlMain);
event.waitUntil(promiseChain);
index.html
Include manifest.json and notification.js file. Here notification.js is a controller and this works with service-worker.js.
<!DOCTYPE html>
</html>
<html>
<head>
<title>Push Demo</title>
<link rel="manifest" href="manifest.json">
</head>
<body>
<div id="container">
<div class="desc"> </div>
<button class="pushButton" disabled>
Subscribe
</button>
</div>
<script src="notification.js"></script>
</body>
notification.js
JavaScript file to control all the subscribers' information. Bit large file split into different parts.
DocumentContent Loader initilise the service worker and this will verify the user subscription. This Code will launch the Allow and Block popup.
var isPushEnabled = false;
});
var pushButton = document.querySelector(".pushButton");
var desc = document.querySelector(".desc");
var disableText = "Unsubscribe";
var enableText = "Subscribe";
var disableDesc = "Thank you message";
var enableDesc = "Click <span class='high'>Allow</span> button top left.";
document.addEventListener("DOMContentLoaded", function() {
if (isPushEnabled) {
unsubscribe();
} else {
subscribe();
}
serviceWorkerCall();
serviceWorkerCall function will register the server-worker.js with initilise function for future actions.
function serviceWorkerCall() {
}
if ("serviceWorker" in navigator) {
navigator.serviceWorker.register("/service-worker.js")
.then(initialiseState);
} else {
console.warn("Service workers aren't supported in this browser.");
}
}
function initialiseState() {
if (!("showNotification" in ServiceWorkerRegistration.prototype)) {
console.log("Notifications aren't supported.");
return;
}
if (Notification.permission === "denied") {
console.log("The user has blocked notifications.");
return;
}
if (!("PushManager" in window)) {
console.log("Push messaging isn't supported.");
return;
}
navigator.serviceWorker.ready.then(function(serviceWorkerRegistration) {
serviceWorkerRegistration.pushManager
.getSubscription()
.then(function(subscription) {
pushButton.disabled = false;
if (!subscription) {
return;
}
if (subscription) {
sendSubscriptionToServer(subscription);
}
pushButton.textContent = disableText;
desc.textContent = disableDesc;
isPushEnabled = true;
})
.catch(function(e) {
console.log("Error during getSubscription()", e);
});
});
subscribe and unsubscribe function to change the message and button status.
function subscribe() {
}
pushButton.disabled = true;
navigator.serviceWorker.ready.then(function(serviceWorkerRegistration) {
serviceWorkerRegistration.pushManager
.subscribe({ userVisibleOnly: true })
.then(function(subscription) {
isPushEnabled = true;
pushButton.textContent = disableText;
desc.textContent = disableDesc;
pushButton.disabled = false;
if (subscription) {
sendSubscriptionToServer(subscription);
}
})
.catch(function(e) {
if (Notification.permission === "denied") {
console.warn("Permission for Notification is denied");
pushButton.disabled = true;
} else {
console.error("Unable to subscribe to push", e);
pushButton.disabled = true;
pushButton.textContent = "Enable Push Messages";
}
});
});
}
function unsubscribe() {
pushButton.disabled = true;
navigator.serviceWorker.ready.then(function(serviceWorkerRegistration) {
serviceWorkerRegistration.pushManager
.getSubscription()
.then(function(pushSubscription) {
if (!pushSubscription) {
isPushEnabled = false;
pushButton.disabled = false;
pushButton.textContent = enableText;
desc.textContent = enableDesc;
return;
}
var temp = pushSubscription.endpoint.split("/");
var registration_id = temp[temp.length - 1];
deleteSubscriptionToServer(registration_id);
pushSubscription.unsubscribe().then(function(successful) {
pushButton.disabled = false;
pushButton.textContent = enableText;
desc.textContent = enableDesc;
isPushEnabled = false;
})
.catch(function(e) {
console.error("Error thrown while unsbscribing from push messaging.");
});
});
});
About functions are calling these following functions. Ajax calls to store and delete the user's registation ids.
// send subscription id to server
}
function sendSubscriptionToServer(subscription) {
var temp = subscription.endpoint.split("/");
var registration_id = temp[temp.length - 1];
fetch(
"http://yourwebsite.com/api/insertGCM/" + registration_id,
{
method: "get"
}
).then(function(response) {
return response.json();
});
}
function deleteSubscriptionToServer(rid) {
fetch("https://yourwebsite.com/api/deleteGCM/" + rid, {
method: "get"
}).then(function(response) {
return response.json();
});
InsertGCM
PHP code to insert registartion id in GCM table. Alwasy check HTTP_ORIGIN to avoid wrong inputs.
function insertGCM($rid) {
}
$check = false;
if($_SERVER['HTTP_ORIGIN'] && $_SERVER['HTTP_ORIGIN'] == "http://yourwesbite.com"){
if($_SERVER['HTTP_ORIGIN'] && $_SERVER['HTTP_ORIGIN'] == "http://yourwesbite.com"){
$check = true;
}
if($check){
$db = getDB();
$sql1 = "SELECT * FROM GMC WHERE rid=:rid";
$stmt1 = $db->prepare($sql1);
$stmt1->bindParam("rid", $rid,PDO::PARAM_STR);
$stmt1->execute();
$mainCount=$stmt1->rowCount();
if($mainCount < 1){
$sql = "INSERT INTO GMC(rid) VALUES (:rid)";
$stmt = $db->prepare($sql);
$stmt->bindParam("rid", $rid,PDO::PARAM_STR);
$stmt->execute();
echo '{"success":{"text":"done"}}';
}
else{
echo '{"success":{"text":"already users"}}';
}
}
else{
echo '{"error":{"text":"No access"}}';
}
Delete
Delete GCM table data based on the registration id.
function deleteGCM($rid) {
}
$check = false;
if($_SERVER['HTTP_ORIGIN'] && $_SERVER['HTTP_ORIGIN'] == "https://push.9lessons.info"){
if($_SERVER['HTTP_ORIGIN'] && $_SERVER['HTTP_ORIGIN'] == "https://push.9lessons.info"){
$check = true;
}
if($check){
$db = getDB();
$sql = "DELETE FROM GMC WHERE rid=:rid";
$stmt = $db->prepare($sql);
$stmt->bindParam("rid", $rid,PDO::PARAM_STR);
$stmt->execute();
echo '{"success":{"text":"done"}}';
}
else{
echo '{"error":{"text":"No access"}}';
}
GetNotification
Get latest notifiaction for service-worker.js
function getNotification(){
}
$db = getDB();
$sql1 = "SELECT title, msg, logo, url, name FROM notifications ORDER BY nid DESC LIMIT 1";
$stmt1 = $db->prepare($sql1);
$stmt1->execute();
$notification = $stmt1->fetch(PDO::FETCH_OBJ);
$notification->action = $notification->url;
$notification->click_action = $notification->url;
if($notification){
$notification = json_encode($notification);
echo '{"data": ' .$notification . '}';
}
Administrator for Sending Push Notifications
SendGCM.php
PHP Curl to communcate with Google Firebase APIs. Modify Your_Authorization_API and check Step 6.
<?php
?>
function sendGCM($fields) {
$url = 'https://fcm.googleapis.com/fcm/send';
$fields = json_encode ($fields);
$headers = array (
'Authorization: key=' . "Your_Authorization_Key",
'Content-Type: application/json'
);
$ch = curl_init ();
curl_setopt ( $ch, CURLOPT_URL, $url );
curl_setopt ( $ch, CURLOPT_POST, true );
curl_setopt ( $ch, CURLOPT_HTTPHEADER, $headers );
curl_setopt ( $ch, CURLOPT_RETURNTRANSFER, true );
curl_setopt ( $ch, CURLOPT_IPRESOLVE, CURL_IPRESOLVE_V4 );
curl_setopt ( $ch, CURLOPT_POSTFIELDS, $fields );
$result = curl_exec ( $ch );
echo $result;
curl_close ( $ch );
}
Push Notification Form
Simple HTML form with title, message, logo and url inputs. Make sure give some authentication/login to protect this page.
<form autocomplete="off" method="post" action="">
</form>
<div>
<label>Title</label>
<input type="text" placeholder="Title" name="title">
</div>
<div >
<label>Message</label>
<input type="text" placeholder="Message" name="msg">
</div>
<div >
<label>Logo</label>
<input type="text" placeholder="Logo" name="logo" value="">
</div>
<div >
<label>Name</label>
<input type="text" placeholder="Name" name="name">
</div>
<div >
<label>URL</label>
<input type="text" placeholder="URL" name="url">
</div>
<div >
<input type="submit" value="Push Notification" name="notificationSubmit" />
</div>
home.php
This will insert form data and sending the push notications to registred users by calling $gcm->getIDs()
<?php
?>
include('config.php');
include('sendGMC.php');
if(!empty($_POST['notificationSubmit'])){
$title=$_POST['title'];
$msg=$_POST['msg'];
$logo=$_POST['logo'];
$name=$_POST['name'];
$url=$_POST['url'];
if(strlen(trim($title))>1 && strlen(trim($msg))>1 && strlen(trim($logo))>1 && strlen(trim($name))>1 && strlen(trim($url))>1 )
{
if($gcmClass->insertNotification($title, $msg, $logo, $name, $url)){
$registrationId = $gcmClass->getIDs();
$total_rids=[];
foreach($registrationId as $r){
array_push($total_rids, $r->rid);
}
$fields = array('registration_ids' => $total_rids);
sendGCM($fields);
echo "Done";
}
}
}
include('header.php');
gcmClass.php
PHP class for insert notification information and getting all the registration ids.
<?php
?>
class gcmClass
{
public function getIDs()
{
try{
$db = getDB();
$stmt = $db->prepare("SELECT rid FROM GMC");
$stmt->execute();
$data=$stmt->fetchALL(PDO::FETCH_OBJ);
return $data;
}
catch(PDOException $e) {
echo '{"error":{"text":'. $e->getMessage() .'}}';
}
}
public function insertNotification($a, $b, $c, $d, $e)
{
try{
$db = getDB();
$stmt = $db->prepare("INSERT INTO notifications(title, msg, logo, name,url) VALUES(:title,:msg,:logo,:name,:url)");
$stmt->bindParam("title", $a,PDO::PARAM_STR) ;
$stmt->bindParam("msg", $b,PDO::PARAM_STR) ;
$stmt->bindParam("logo", $c,PDO::PARAM_STR) ;
$stmt->bindParam("name", $d,PDO::PARAM_STR) ;
$stmt->bindParam("url", $e,PDO::PARAM_STR) ;
$stmt->execute();
return true;
}
catch(PDOException $e) {
echo '{"error":{"text":'. $e->getMessage() .'}}';
}
}
}
config.php
Database configuration file. You have to modify the database username and password.
<?php
/* DATABASE CONFIGURATION */
define('DB_SERVER', 'localhost');
define('DB_USERNAME', 'username');
define('DB_PASSWORD', 'password');
define('DB_DATABASE', 'database');
define("BASE_URL", "https://www.yourwebsite.com/");
define("SITE_KEY", 'yourSecretKeyyx');
function getDB()
{
$dbhost=DB_SERVER;
$dbuser=DB_USERNAME;
$dbpass=DB_PASSWORD;
$dbname=DB_DATABASE;
$dbConnection = new PDO("mysql:host=$dbhost;dbname=$dbname", $dbuser, $dbpass);
$dbConnection->exec("set names utf8");
$dbConnection->setAttribute(PDO::ATTR_ERRMODE, PDO::ERRMODE_EXCEPTION);
return $dbConnection;
}
include('class/gcmClass.php');
$gcmClass = new gcmClass();
?>






is it working in all browser ??
ReplyDeletecan i gets its full source code?
ReplyDeleteAmazing! I have searched this type of tutorial several times in past but didn't find any article and then I have to only relay on onesignal push notifications. I hope after learning this I will be able to have my own notification system.
ReplyDeleteIt is possible to have the source code ? thanks a lot
ReplyDeleteOn the demo page if I disallow subscription and I refresh the page, subscription status changed alwas to allowed.
ReplyDeletecan you provide download with structure. am readying and following the instructions but nothings happening
ReplyDeletehey bro, without the files, it`s hard to keep !
ReplyDeleteThanks Sir for sharing the information,amazing blog
ReplyDeleteGreat! Push Notification using ASP.NET in server?
ReplyDeleteThis man is really great... kudos to 9lessons Boss.....
ReplyDeletecan you provide google calendar API?
ReplyDeleteand how to manage events ?
Really great...
ReplyDeletegreat job
ReplyDeleteDear Srinivas,
ReplyDeleteCan you provide the zip file to download this script? I tried but failed to connect the dots.
Thanks for sharing, keep it up sir and thks
ReplyDeleteI am agree to your article ….its right and perfect for business growth help to blog
ReplyDeleteThanks for sharing
Have good day
nice blog sir
ReplyDeletethanks for sharing ...
ReplyDeleteHi..sir,..nice topic...thanks.
ReplyDeleteGrate post and very usefull
ReplyDeleteyes very usefull
DeleteGood information.
ReplyDeleteBut, does it works in all the browsers?
Sir you have written a lot of work keep helping people like this even further.
ReplyDeleteVery good information
ReplyDeletehello, thanks for your information...
DeleteI use onesignal to enable push notification on my blog. I was searching a manual way to do that. Does this method work on all modern browsers?
ReplyDeletevery useful its working..
ReplyDeletebut unsubscribe not working for me please help.
Hi very nice articles.
ReplyDeleteKeep up very good work.
Nice post sir
ReplyDeleteamazing article, thank you for this sharing article,
ReplyDeletei learn from your bloggs and article, this is very helpful to me.
Thank you, amazing article. I was able to make it work in Chrome, but in firefox it did not work, I looked at debug: the mensage Fetch
ReplyDeleteNot listening for fetch events.
you are the inspiration for peoples and your blog article always awesome and I read it daily and waiting for your new article
ReplyDeleteyou are the inspiration for peoples and your blog article always awesome and I read it daily and waiting for your new article thanks srinivas sir for helping us
ReplyDeleteThank you
DeleteThanks for providing complete information about push notifications
ReplyDeletethank you so much for giving me information about push notification
ReplyDeleteHuge detailed information. Thank you Srinivas.
ReplyDeleteAll configuration setting is done from our side and value inserted in database aslo but i'm not get any message on browser. getNotification is not calling?
ReplyDelete